|
|


|
|
First Team System Consultant
: |
|
Tom Nicotera - |
Toll Free: 877.272.5430
|
|
All First Team systems come with complete, detailed installation instructions. I can provide installation instructions in advance by request. Systems are easily installed by anyone with experience following mechanical instructions. No special engineering experience is required to assemble/install in-ground, bolt-down or portable systems.
Wallmount/Roofmount Systems: It is recommended you consult a contractor to ensure your structure will support the system.
Need help with installation? I have 3rd party installers throughout the country that I can refer you to. Learn more >>
Sample Installation Instructions for Attack System.
| Bill of Materials |
|
|
| A (1) Vertical Post |
I(1) ½" x 11" Hex Bolt |
Q(8) 5/16" Lockwasher |
| B(1) Main Extension Arm |
J(8) ½" Locknut |
R(8) 5/16" Hex Nut |
| C(2) Parallel Linkage |
K(4) 5/8" Anchor Bolt |
S(1) Rim Height Sticker |
| D(1) H-Frame Backboard Mount |
L(12) 5/8" Hex Nut |
T(1) Rim Height Indicator |
| E(1) Spring-Assist Cartridge |
M(1) Anchor Footing Template |
|
| F(1) Crank Adjustment Cylinder |
N(4) Anchor Footing Rebar |
|
| G(2) ½" x 4 ½" Hex Bolt |
O(8) 5/16" x 1" Machine Screw |
|
| H(5) ½" x 10" Hex Bolt |
P(8) 5/16" Flat Washer |
|
NOTE: Immediately unpack all components and cross check
against bill of materials. Report any shortages to First Team customer service
at 1-888-884-6677 or Institutional Basketball Systems at 1-877-272-5430.
1. CAUTION: YOUR SPRING-ASSIST CARTRIDGE IS SHIPPED
UNDER TENSION. DO NOT REMOVE CARDBOARD SPREADER TUBE FROM SPRING-ASSIST UNTIL
INSTRUCTED TO DO SO. FOLLOW INSTRUCTIONS CAREFULLY.
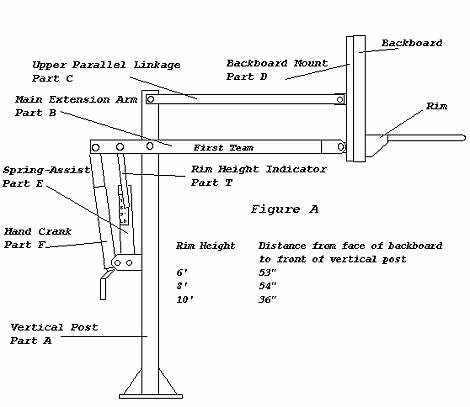
2. Choose the proper location to dig for the concrete footing.
Use the distance chart in figure A to help you make your decision. When choosing
the exact position to dig, make sure to maximize the amount of playing surface
while minimizing possible driveway obstruction.
3. Dig hole 36" deep and 20" square. Be sure to bell out the bottom
12" of the hole to give added stability to the footing. NOTE: If you live
in an area where the frost line is below 36" it is advisable to dig to
normal frost line. Do not cheat on the hole size, it is imperative that the
hole be a minimum of 36" deep and 20" square!
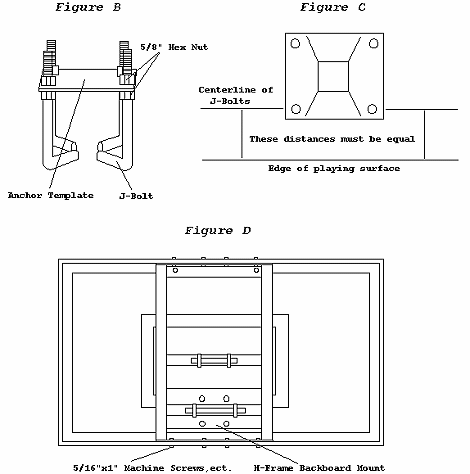
4. Assemble the anchor kit as shown in figure B. First thread a 5/8" hex
nut (L) 2 ½" of the way on to each J-Bolt (K). Place the threaded
end of each J-Bolt through the 4 holes located in the anchor template (M). Then
thread a second 5/8" nut on to each J-Bolt until tight against the template,
making sure to keep the J-Bolt hooks pointing in toward the center of the template.
5. For this step you will need: Level; Broomstick; Tape Measure. The 36"
x 20" anchor footing will require approximately 1/3 yard of 3000 psi concrete
(18-20 60# sacks of premix concrete). More will be needed if you dig a larger
hole. Make certain that you have enough concrete to finish the job. Allowing
a portion to dry while you purchase more concrete will weaken the footing.
6. Mix the concrete according to the instructions on the bag. It is better to
mix it slightly wet than too dry. Fill the hole full to ground level with as
little time between batches as possible. Insert the broomstick in 3 or 4 different
places and vibrate up and down to settle the concrete. Submerge the (4) anchor
footing rebar pieces (N) into the center of the hole spaced evenly. Next set
the anchor bolt assembly into the wet concrete, vibrate it as it goes in to
make sure the concrete fills in around the J-Bolt hooks. Make sure the template
is pressed firmly against the top of the wet concrete. Use the level to ensure
that it is level in all directions. Additionally, the center line of the J-Bolts
must be parallel with the edge of the playing surface. (See figure C)
STOP HERE! Allow footing to cure for seven days before proceeding.
7. Take off the top 5/8" nuts from the J-Bolts, remove the template and
discard it.
8. Thread a second 5/8" nut on to each J-Bolt down against the nut embedded
in the concrete.
9. Place the vertical post (A) down over the footing making sure not to damage
the J-Bolt threads. Using the final (4) 5/8" hex nuts, bolt down post finger
tight with welded tabs facing away from playing surface.
10. Level the vertical post by adjusting the 5/8" nuts located underneath
the base plate. Then tighten top nuts against the top side of the base plate.
11. Slide the main arm (B) over the top of the vertical post and attach to the
lower pivot tube with a ½" x 10" hex bolt (H) and ½"
locknut (J).
12. Slide the hole located in the rim height indicator (T) over one of the second
set of welded tubes in the main arm. Attach the spring-assist cartridge (E)
to the second set of attachment holes on both the main arm and the vertical
post welded tabs utilizing a ½" x 10" hex bolt (H) and a ½"
x 4 ½" hex bolt (G). Tighten each with a ½" locknut
(J). The rim height indicator should now hang freely along side the spring-assist
cartridge.
13. Next attach the hand crank adjustment cylinder (F) using a ½"
x 10" hex bolt (H) and ½" x 4 ½" hex bolt (G).
Tighten each with a ½" locknut (J). Next, remove and discard the
cardboard spreader tube from the spring-assist cartridge.
14. Attach parallel linkages ( C ) to vertical post with ½" x 10"
hex bolt (H) and ½" locknut (J). Attention: It does not matter which
end of the parallel link you attach to the vertical post.
Caution: Injury may occur if linkages are allowed to fall off main arm during
assembly.
15. Next, assemble the H-Frame backboard mounting (D) to the backboard as shown
in figure D. Use the (8) 5/16" x 1" machine screws (O), (8) 5/16"
flat washer (P), (8) 5/16" lockwasher (Q), (8) 5/16" hex nuts ( R
). If your backboard is tempered glass check to make sure all four steel grommets
are located at the rim holes, if any are missing check in the box. If grommets
are missing and cannot be located, DO NOT proceed with assembly, call First
Team immediately. If your backboard is acrylic you must remove and discard the
plastic shipping block from the backboard joint to complete this step. Additionally,
if you purchased an acrylic backboard you should have received two rubber gaskets
enclosed with the backboard. Place one gasket between the H-Frame backboard
mount and the backside of the backboard. You will use the other gasket later
during assembly. Rubber gaskets are necessary for acrylic boards only.
16. Mount the H-Frame/Backboard assembly lower pivot tube first to the main
arm using (1) ½" x 11" hex bolt (I) and (1) ½"
locknut (J). Next, attach the upper H-Frame pivot tube to the upper parallel
linkages using (1) ½" x 10" hex bolt (H) and (1) ½"
locknut (J).
17. Check face of backboard to see if it is level forward and back. If it is
out of level, correct it by adjusting the 5/8" nuts located underneath
the vertical post base plate.
18. Mount the rim to the H-Frame/Backboard assembly using the hardware supplied
in the rim box. If you purchased an acrylic backboard make sure to place the
second rubber gasket (included with backboard) between the face of the backboard
and the backplate of the rim. Trim gasket if necessary. Use level to make sure
rim is level side to side before tightening nuts.
19. After everything is square, make sure all nuts have been tightened. However,
do not overtighten, if unit is difficult to crank up and down the main pivot
nuts are probably too tight.
20. To apply the rim height sticker (S), first use a tape measure to crank rim
up to exactly 10' from the playing surface. Use a pencil to make a mark on the
spring-assist outer tube where the rim height indicator stops. Then, peel and
apply sticker to outside of spring-assist cartridge lining up the pencil mark
with the 10' mark on the sticker. See Figure A for a diagram of a completed
height indicator assembly.
Note: It is advisable to wait up to two weeks to allow the anchor
footing to fully cure before aggressive play
|
|
|
 |
| :: NOW AVAILABLE :: RESIDENTIAL BASKETBALL
SYSTEMS
Durable, dependable basketball systems affordably priced and designed for slightly lighter use than public, unsupervised play. Recommended for private family, supervised use. Residential FIXED height
Residential ADJUSTABLE height
|
| HOW YOU SAVE MONEY! |
| The majority of the deals I put together for my customers are for multi-unit purchases. Given that, I can negotiate better shipping rates from the various freight carriers, Yellow, FedEx, SAIA. Private consumer orders and single-unit orders are welcome and encouraged! You'll get the same great unit price and the lowest possible cost on freight.
DON'T BE FOOLED by system pricing that includes FREE freight. I can beat those prices.
|
WHAT'S MOST COMMON? |
| Hands down the RuffNeck System; in-ground, fixed-height, is the most cost-effective for public, outdoor use. 20-year warranty, nice board size, very cost-effective. RuffNeck systems ship for as little as $110 depending on location. RuffNeck systems ship for as little as $110 depending on location.
For a little nicer looking system with a bit more functionality, consider the Legend and the Legend Jr.
Adjustable Height: You can't go wrong with any. Most cost-effective is the Attack System but the move up to the Force System or Titan System gets you not only larger board size options, but also the Lifetime Superior Warranty.
Portables: The Fury System is the most commonly sold system to church groups and youth groups, and any organization type where you know, more or less, who's going to play on it. It's heavy enough for aggressive adult play and more than stable enough for youth play. Lifetime Limited Warranty covers everything basketball related, including dunking, but not the SHAQ hang on the rim gorilla slam. For aggressive play or high-level competition play, go up to the Storm System or Thunder System. They are heavier so can support a larger board (glass) and they come with a Lifetime Superior Warranty. Everything is covered.
Please contact me via this web site or give a call toll free if I can answer any questions. I assure you I can put you in the best system for your needs and no one will be more helpful as you sort through sourcing your systems.
Tom Nicotera
877-272-5430
|
|